How to Maximize Yield With Strategic LED Light Placement
Maximizing crop yield with strategic LED light placement involves several key steps. Understand your plant’s specific light requirements. Different plants have unique needs about light intensity and spectrum. Determine the ideal distance between lights and plants to avoid light burn while ensuring plants receive adequate light.
Next, consider the light angle. For vertical farming or hydroponic setups, direct light at various angles can eliminate shadows and provide even coverage. Position lights to allow 100% coverage of your growing area. Remember, overlapping light from multiple sources can boost intensity without increasing energy costs.
Then, pay attention to timing. Adjust light duration according to your plants’ growth stages. Seedlings often thrive under 16-18 hours of light, while mature plants may require 12-14 hours. Utilizing a programmable timer can consistently deliver optimal light periods.
Also, regularly evaluate the effectiveness of your lighting arrangement. Observe plant growth and health; make adjustments if needed. Monitoring plant responses to light can guide you in fine-tuning your settings for maximum yield.
See also: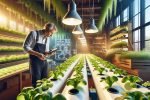 6 nutrient solution mistakes that kill your hydroponic veggies fast
Explore Hydro4Grow’s resources for more in-depth advice on optimizing your hydroponic farming system. Leverage expert insights to enhance your knowledge and grow successfully.
Understanding LED Light Placement
Effective LED light placement plays a vital role in enhancing plant growth and production. Your approach to lighting can significantly influence yield, so understanding the factors at play is essential.
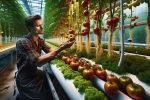
Benefits of LED lighting for yield
LED lighting offers numerous advantages for boosting crop yield. Increased energy efficiency is a key benefit. LED lights consume up to 75% less energy compared to traditional lighting, translating to lower electricity costs. Longer lifespan comes next, with LED lights lasting over 50,000 hours. That means less frequent replacements, reducing downtime and maintenance costs.
Targeted spectrum is another standout feature. LED lights can be designed to emit specific wavelengths that favor photosynthesis, enhancing plant growth at crucial stages. For example, blue light promotes leafy growth, while red light encourages flowering and fruiting. This tailored approach can lead to healthier plants and larger yields.
 Hydroponic nutrient hacks for jaw-dropping tomatoes revealed
Also, lower heat output allows for closer placement to plants. This proximity increases light intensity without causing heat stress. Better light intensity means improved photosynthesis and, eventually, higher productivity. Explore more about how LED lighting can transform your hydroponic setup on Hydro4Grow.
Factors influencing light placement
Light placement hinges on various factors to optimize plant growth. Plant type is a primary consideration. Different plants have unique light requirements. For instance, leafy greens require less light intensity compared to fruiting plants, which thrive under stronger light. Tailoring your setup based on these needs maximizes resource efficiency.
Distance from plants significantly impacts light effectiveness. Ideally, maintain a distance of 12 to 24 inches between the lights and your plants, adjusting as necessary based on the light capacity. This distance prevents light burn while ensuring adequate coverage.
Light angle also matters. Aligning lights at a 45-degree angle helps minimize shadowed areas, particularly in multi-tier hydroponic systems. More even light distribution fosters consistent growth across all plant levels.
 Organic vs. synthetic nutrients: which is best for hydroponic veggies?
Finally, light duration plays a crucial role in growth cycles. Adjusting the light on and off times based on plant growth stages contributes to optimal health. Programmable timers can streamline this process, ensuring precision day after day. For deeper insights, navigate through Hydro4Grow’s resources to enhance your setup.
Preparing for Light Placement
Successful light placement involves gathering the right materials and tools. Understanding both helps ensure your hydroponic setup thrives under optimal conditions.
Materials needed
- LED grow lights: Select lights with the appropriate spectrum for your plants. Blue light assists vegetative growth, while red light promotes flowering and fruiting.
- Light hangers: These durable ropes or adjustable brackets allow you to position lights at the best distance from your plants—usually between 12 to 24 inches.
- Timers: Programmable timers enable you to automatically adjust light duration. Consistency maximizes your plants’ growth cycles.
- Reflective materials: Use mylar or white paint on walls to enhance light distribution. Reflectivity helps to use all emitted light effectively.
Proper materials streamline the light placement process, ensuring your plants receive the ideal conditions for maximum yield.
- Measuring tape: Accurately measure distances between lights and plants to avoid light burn or underexposure.
- Light meter: This tool measures light intensity, ensuring your plants receive the correct amount of light based on their growth stage.
- Adjustable ladder or platform: Use this tool for easy access while installing or adjusting your LED lights at various heights.
- Cordless drill: A drill aids in securely mounting fixtures, ensuring stability for your lighting system.
Equipping yourself with the right tools prepares you to optimize your hydroponic garden. Visit Hydro4Grow’s website to deepen your understanding of effective light placement strategies and more.
See also: Why your hydroponic lettuce tastes bland? Fix it easily
Strategic Placement Techniques
Effective light placement can significantly enhance your hydroponic growth system. By utilizing strategic methods, you optimize yield and plant health.
Vertical layering
Vertical layering allows you to use space efficiently. Create multiple tiers for your plants. This arrangement maximizes light exposure and produces higher yields. Gain insights on how to stack plants based on their light requirements. For instance, leafy greens like lettuce thrive under higher light intensities. Position them near the top tier, while herbs, which prefer softer light, can rest on lower layers. Adjust LED light placement accordingly to ensure each level receives appropriate light coverage. Use reflective materials to bounce light back to lower layers. By implementing vertical layering, you enhance plant growth and make effective use of your setup.
Horizontal spacing
Horizontal spacing between plants ensures that light reaches each one without obstruction. Space your plants at least 12 to 24 inches apart. This distance allows for even light distribution and reduces competition for resources. When plants are overcrowded, lower light intensity leads to weaker growth. Consider using wider LED fixtures that cover more ground. Also, monitor plant growth and adjust spacing as they mature. Utilizing this technique enhances airflow, reduces the risk of disease, and promotes healthier, happier plants. Remember, carefully planning your horizontal spacing boosts your hydroponic system’s productivity.
Angle of light distribution
The angle of light distribution plays a vital role in how effectively plants use light. Aim to position your LED lights at approximately 30 to 60 degrees from the horizontal plane. This angle minimizes shadows and allows for even light coverage across all plant areas. Experiment with tilting light fixtures slightly for optimal results and observe plant responses. Various plants respond differently to angles; leafy varieties may appreciate a broader angle. Use light meters to measure intensity at different points within your setup. Fine-tuning the angle of your lights maximizes photosynthesis and boosts yield in your hydroponic garden.
Explore Hydro4Grow’s resources for more valuable techniques and expert advice on maximizing your hydroponic setup.
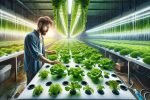
Optimizing Light Intensity
Achieving optimal light intensity is essential for maximizing plant growth in hydroponic systems. Proper light levels enhance photosynthesis, leading to healthier plants and increased yields.
Measuring light intensity
Measuring light intensity helps you understand how much light your plants receive. Start by using a light meter; place it at the height of the plant canopy for accurate readings. Ideal light levels typically range from 200 to 600 µmol/m²/s, depending on the plant type. Many leafy greens thrive at lower intensities, while fruiting plants often require more. Regular measurements ensure that light intensity remains consistent. Adjustments might be necessary based on plant growth stages or seasonal changes. Consistent monitoring allows you to fine-tune your lighting setup effectively.
Adjusting distance between plants and lights
Adjusting the distance between your plants and LEDs impacts light intensity significantly. Aim for a distance of 12 to 24 inches depending on the wattage of your lights. Higher wattage lights generally require more distance to prevent light burn. As plants grow, you can lower the lights to maintain optimal exposure. Remember, heat output can also affect light placement; LEDs produce less heat compared to other light types, allowing closer positioning. Frequent assessments help you keep track of plant health and adjust as necessary. Check your plants regularly for signs of stretching or burning, and adjust light distance accordingly.
Explore various sections of Hydro4Grow for advanced tips that can help you optimize your hydroponic farming systems further.
Timing and Duration of Light Exposure
Understanding the timing and duration of light exposure significantly impacts your plants’ growth and yield. Each plant species has unique light cycle requirements that align with its growth stages and natural habitats.
Ideal light cycles for different plants
Plants thrive under specific light cycles. For example, leafy greens, like lettuce or spinach, often prefer 14 to 18 hours of light each day. This extended exposure promotes robust growth without stressing the plants. On the other hand, flowering plants, such as tomatoes or peppers, typically respond best to around 12 to 16 hours of light, especially during their flowering and fruiting stages. This shift mimics the natural seasonal changes and enhances fruit production. Remember, shorter dark periods lead to more flowering, while longer ones can promote healthier foliage growth.
How to set a timer
Setting a timer for your LED lights simplifies maintaining optimal light cycles. Programmable timers offer accuracy and convenience, allowing you to set daily schedules easily. Start by determining your plants’ light needs, as previously mentioned. Next, connect your timer to the power source and plug your LED lights into it. Most timers enable you to set the hours ON and OFF. For instance, if your leafy greens require 16 hours of light, program the timer to turn on at 6 AM and off at 10 PM. When the lights turn OFF, ensure your plants receive complete darkness to help essential rest and respiration. Regularly check the timer for accuracy and replace it if malfunctioning.
Explore Hydro4Grow for a wealth of information on optimizing your hydroponic lighting strategy, and discover more expert advice on plant care.
Troubleshooting Common Issues
Addressing common lighting issues ensures optimal plant growth. Without proper care, problems can impact yield.
Uneven growth
Uneven growth often results from inconsistent light distribution. If certain areas of your grow space receive more light than others, plants will grow unevenly. To fix this, adjust your LED lights for even placement.
Dark spots could signal inadequate lighting. For instance, if leafy greens on one side are thriving while those on another side appear stunted, examine your light setup. Carry out horizontal spacing to allow for better light coverage. Also, consider vertical layering. This method lets you place shorter plants closer to the lights.
Pay attention to your plant types. Different plants require varying light levels. Knowing their needs creates a more balanced environment.
Light burn symptoms
Light burn appears in many forms. Symptoms include yellowing leaves or crispy edges. If you notice these issues, check the distance between your lights and plants.
Typically, placing lights 12 to 24 inches above your plants works well. If this distance is too short, you risk damaging your plants. Adjust the lights accordingly and monitor your plants regularly for improvement.
Also, consider the light intensity. High-intensity LEDs can cause stress if placed too close. Track how your plants react to changes in light exposure to avoid light burn in the future.
Light stretching in plants
Light stretching occurs when plants grow tall and spindly, searching for light. If your plants look leggy, they may not receive enough light. In this case, reposition your lights to provide more intensity.
Another factor contributing to stretching may be the angle of light. Position your LED lights between 30 and 60 degrees to minimize shadows. This setup encourages balanced growth.
Besides, consider the light duration. Setting timers for 14 to 18 hours promotes healthy growth for leafy greens. Experiment with light duration based on your plant types.
Helpful Tips for Better Results
Regularly monitor plant health
Healthy plants thrive under optimal light conditions. Regular monitoring of plant health prevents issues before they escalate. Check for signs of stretching, burning, or uneven growth, which can indicate incorrect light placement. Adjust lighting as necessary to maintain an ideal distance of 12 to 24 inches from the canopy, depending on the wattage of your LEDs. Use a light meter to ensure you hit the right intensity level as you monitor changes.
Signs of stress in your plants? Address them promptly. For instance, stretching indicates they crave more light; burning suggests they’re too close. Tracking these changes means a healthier yield for your garden. Remember to review light duration as well; different plant species require unique cycles. Keeping an eye on these details creates a strong foundation for productive growth, ensuring your hydroponic systems yield their best.
Experimenting with different light positions
Adjusting light positions can significantly impact plant growth. Experiment with angles and distances to discover what works best for your setup. Shifting lights from horizontal to vertical arrangements encourages broader coverage and minimizes shadows. Positioning them at a 30 to 60-degree angle optimizes light distribution, enhancing photosynthesis.
Conduct small trials with various light placements over the course of a few weeks. You may find some plants thrive closer to the light while others perform better further away. Keeping meticulous notes during this process provides insights into each plant’s preferences. At Hydro4Grow, we recommend exploring our resources, which offer expert advice and proven strategies for fine-tuning your light placement.
Ready to elevate your hydroponic farming approach? Dive deeper into our website to discover more on maximizing your yields through strategic light placement.
Maximizing yield through strategic LED light placement is a vital aspect of successful gardening or farming. By understanding your plants’ specific light requirements and adjusting factors like distance, angle, and duration, you can create an optimal environment for growth.
Regular monitoring and experimentation will help you fine-tune your setup for the best results. Don’t hesitate to explore additional resources and expert insights to further enhance your hydroponic systems. With the right approach, you’ll see healthier plants and larger yields in no time.